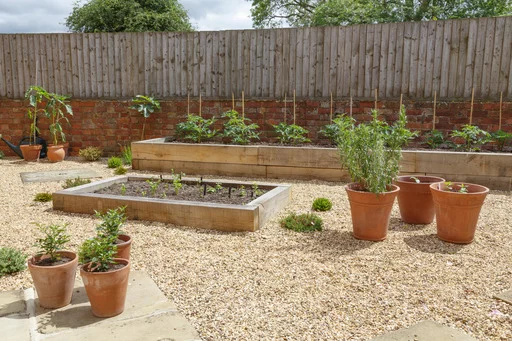
Sleepers, traditionally used in railway construction, have become a popular material for creating raised garden beds. Their durability and versatility make them a perfect option for gardeners looking to build beds for flowers or vegetables.
Benefits of using sleepers for raised beds
1) Durability and longevity:
Sleepers, especially those made from hardwood or treated timber, are extremely robust. They withstand the elements, making them perfect for long-lasting raised beds that endure rain, sun, and frost.
2) Easy installation:
Unlike traditional brick or stone walls, sleepers can be stacked and installed quickly and easily.
3) Rustic aesthetic:
Sleepers lend a natural look to your landscaping project. Their aged timber texture provides a rustic appeal, blending seamlessly into natural environments or more structured garden designs.
4) Cut to size:
Landscaping sleepers are incredibly versatile. They can be cut to size, allowing for custom designs—whether you want a small herb garden or a larger vegetable plot.
Step-by-step guide to building raised beds with sleepers
1) Plan your design:
Before building, measure the space where you want the raised bed. Sketch out the dimensions, considering the width, height, and depth of your bed. Keep in mind that sleepers typically come in standard sizes, which will influence your design.
2) Prepare the ground:
Clear the area where the raised bed will be placed. Ensure the ground is level to provide a stable foundation for the sleepers. For extra stability, you may wish to dig shallow trenches to place the bottom layer of sleepers into the soil.
3) Assemble the frame:
Start by laying the first row of sleepers in place, securing them at the corners with landscaping screws or timber stakes. You can stack additional layers on top, fixing each one to the layer below with long screws or metal brackets for added support.
4) Line the bed:
To protect the sleepers and prevent soil erosion, consider lining the interior of the raised bed with a landscape fabric or plastic sheeting. This also helps to retain moisture in the soil.
5) Fill with soil and compost:
Once the frame is complete, fill your raised bed with a rich mixture of soil, compost, and organic matter, tailored to the plants you intend to grow. Raised beds offer excellent drainage, so ensure the soil mixture is appropriate for your crops.
6) Plant:
With your raised bed constructed, you’re ready to start planting. Raised beds are ideal for growing vegetables, herbs, flowers, or even shrubs, providing a controlled growing environment that can be easily managed. Raised beds are easier to plant and maintain as there is less bending as the ground level is higher.